Android Studio OpenCV + Tesseract OCR 어플 만들기
Laptop
Mobile
Windows 에서 android studio 2.2 이상 + opencv 3.1 + ndk 개발환경 만들기:
http://webnautes.tistory.com/1054
우선 OpenCV 환경을 위해서 위 링크의 2번 과정을 먼저 거쳐야한다.
단, 프레임단위 작업 및 이후 글자 인식의 효율을 높일 기능을 추가할 가능성을 두고 OpenCV를 사용한 것이기 때문에, 일단 이 프로그램에서 C++ 및 JNI 부분까지는 필요하지 않다. 단 그러기 위해 프로젝트 생성할 때 C++ 관련 항목들을 모두 체크해두는 게 좋을 것 같다. (Include C++ support, finish 바로 전에 Customize C++ Support 체크박스 두개)
또한 똑같이 MainActivity가 아니라, CameraView라는 액티비티를 새로 생성하여 MainActivity에서 Intent를 이용하여 띄우는 방식으로 구현하였다.
그대로 MainActivity로 생성했어도 소스를 복사하고 아래와 같이 intent-filter를 변경해주면 된다.
AndroidManifest.xml
<?xml version="1.0" encoding="utf-8"?>
<manifest xmlns:android="http://schemas.android.com/apk/res/android"
    package="com.opencvocr">

    <uses-permission android:name="android.permission.CAMERA" />

    <uses-feature
        android:name="android.hardware.camera"
        android:required="false" />
    <uses-feature
        android:name="android.hardware.camera.autofocus"
        android:required="false" />
    <uses-feature
        android:name="android.hardware.camera.front"
        android:required="false" />
    <uses-feature
        android:name="android.hardware.camera.front.autofocus"
        android:required="false" />

    <supports-screens
        android:anyDensity="true"
        android:largeScreens="true"
        android:normalScreens="true"
        android:resizeable="true"
        android:smallScreens="true" />

    <application
        android:allowBackup="true"
        android:icon="@mipmap/ic_launcher"
        android:label="@string/app_name"
        android:roundIcon="@mipmap/ic_launcher_round"
        android:supportsRtl="true"
        android:theme="@style/AppTheme">
        <activity android:name=".MainActivity">
            <intent-filter>
                <action android:name="android.intent.action.MAIN" />

                <category android:name="android.intent.category.LAUNCHER" />
            </intent-filter>
        </activity>
        <activity
            android:name=".CameraView"
            android:configChanges="keyboardHidden|orientation"
            android:screenOrientation="landscape"
            android:theme="@android:style/Theme.NoTitleBar.Fullscreen" />
    </application>

</manifest>
Tesseract 개발 환경은 간단히 app의 build.gradle에서 다음 한 줄을 추가해주면 된다.
그리고나면 상단에 노란색 알림이 뜰텐데, Sync Now를 클릭해주고 완료를 기다리면 된다.
dependencies {
    ...
    compile 'com.rmtheis:tess-two:6.3.0'
}
(글 작성 시점 최신버전은 6.3.0 이었다. 아래 링크에서 확인해보면 된다.)
https://github.com/rmtheis/tess-two/releases
또한 아래에서 kor.tessdata를 다운받아 main/assets 폴더를 생성하여 안에 넣어준다.
https://github.com/tesseract-ocr/tessdata
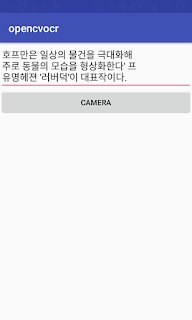
다음은 MainActivity 레이아웃이다. 간단하게 OCR 결과를 받아올 EditView와 카메라를 띄울 버튼으로 구성했다.
(res - values - strings.xml 에
<string name="ocr_result_tip">인식 결과는 여기에 나타납니다.</string>
가 선언되어 있는 상태이다.)
activity_main.xml
<?xml version="1.0" encoding="utf-8"?>
<LinearLayout xmlns:android="http://schemas.android.com/apk/res/android"
    android:orientation="vertical" android:layout_width="match_parent"
    android:layout_height="match_parent">

    <EditText
        android:id="@+id/edit_ocrresult"
        android:layout_width="match_parent"
        android:layout_height="wrap_content"
        android:hint="@string/ocr_result_tip"
        android:text="" />

    <Button
        android:id="@+id/btn_camera"
        android:layout_width="match_parent"
        android:layout_height="wrap_content"
        android:text="Camera" />

</LinearLayout>
두 Activity간 데이터 전송은 startActivityForResult로 선언한 Intent를 띄우고, onActivityResult 메소드에서 if문을 통해 해당 requestcode에 맞을 때 알맞는 코드를 입력하면 된다.
또한 AssetManager를 통해 아까 assets 폴더에 넣었던 tessdata를 기기에 다운받을 수 있게 된다.
Tesseract 객체는 static으로 선언하여 CameraView에서도 사용될 수 있게 한다.
MainActivity.java
package com.opencvocr;

import android.content.Intent;
import android.content.res.AssetManager;
import android.os.Bundle;
import android.support.v7.app.AppCompatActivity;
import android.view.View;
import android.widget.Button;
import android.widget.EditText;

import com.googlecode.tesseract.android.TessBaseAPI;

import java.io.File;
import java.io.FileNotFoundException;
import java.io.FileOutputStream;
import java.io.IOException;
import java.io.InputStream;
import java.io.OutputStream;


public class MainActivity extends AppCompatActivity {

    private Button mBtnCameraView;
    private EditText mEditOcrResult;
    private String datapath = "";
    private String lang = "";

    private int ACTIVITY_REQUEST_CODE = 1;

    static TessBaseAPI sTess;

    @Override
    protected void onCreate(Bundle savedInstanceState) {
        super.onCreate(savedInstanceState);
        setContentView(R.layout.activity_main);


        // 뷰 선언
        mBtnCameraView = (Button) findViewById(R.id.btn_camera);
        mEditOcrResult = (EditText) findViewById(R.id.edit_ocrresult);
        sTess = new TessBaseAPI();


        // Tesseract 인식 언어를 한국어로 설정 및 초기화
        lang = "kor";
        datapath = getFilesDir()+ "/tesseract";

        if(checkFile(new File(datapath+"/tessdata")))
        {
            sTess.init(datapath, lang);
        }

        mBtnCameraView.setOnClickListener(new View.OnClickListener() {

            @Override
            public void onClick(View v) {

                // 버튼 클릭 시

                // Camera 화면 띄우기
                Intent mIttCamera = new Intent(MainActivity.this, CameraView.class);
                startActivityForResult(mIttCamera, ACTIVITY_REQUEST_CODE);

            }
        });
    }


    boolean checkFile(File dir)
    {
        //디렉토리가 없으면 디렉토리를 만들고 그후에 파일을 카피
        if(!dir.exists() && dir.mkdirs()) {
            copyFiles();
        }
        //디렉토리가 있지만 파일이 없으면 파일카피 진행
        if(dir.exists()) {
            String datafilepath = datapath + "/tessdata/" + lang + ".traineddata";
            File datafile = new File(datafilepath);
            if(!datafile.exists()) {
                copyFiles();
            }
        }
        return true;
    }

    void copyFiles()
    {
        AssetManager assetMgr = this.getAssets();

        InputStream is = null;
        OutputStream os = null;

        try {
            is = assetMgr.open("tessdata/"+lang+".traineddata");

            String destFile = datapath + "/tessdata/" + lang + ".traineddata";

            os = new FileOutputStream(destFile);

            byte[] buffer = new byte[1024];
            int read;
            while ((read = is.read(buffer)) != -1) {
                os.write(buffer, 0, read);
            }
            is.close();
            os.flush();
            os.close();

        } catch (FileNotFoundException e) {
            e.printStackTrace();

        } catch (IOException e) {
            e.printStackTrace();
        }
    }

    protected void onActivityResult(int requestCode, int resultCode, Intent data) {
        super.onActivityResult(requestCode, resultCode, data);
        if(resultCode==RESULT_OK)
        {
            if(requestCode== ACTIVITY_REQUEST_CODE)
            {
                // 받아온 OCR 결과 출력
                mEditOcrResult.setText(data.getStringExtra("STRING_OCR_RESULT"));
            }
        }
    }
}
다음은 CameaView 레이아웃이다.
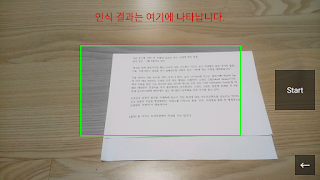
OpenCV에서 사용되는 JavaCameraView 위에 시작 및 종료버튼을 띄우고, SurfaceView 2개를 이용하여 하나는 background 색을 주고, 그 위에 약간 작게 투명한색 (#00ff0000) 을 겹쳐 테두리처럼 보이도록 했다.
그리고 상단에 OCR 결과 텍스트가 출력되고 캡쳐한 이미지는 ImageView를 통해 중앙 ROI 부분에 띄우게 된다.
camera_view.xml
<?xml version="1.0" encoding="utf-8"?>
<RelativeLayout xmlns:android="http://schemas.android.com/apk/res/android"
    xmlns:app="http://schemas.android.com/apk/res-auto"
    xmlns:tools="http://schemas.android.com/tools"
    android:layout_width="fill_parent"
    android:layout_height="fill_parent"

    >

    <org.opencv.android.JavaCameraView
        android:id="@+id/activity_surface_view"
        android:layout_width="match_parent"
        android:layout_height="match_parent"
        />

    <!--ROI 영역-->
    <SurfaceView
        android:id="@+id/surface_roi_border"
        android:layout_width="0dp"
        android:layout_height="0dp"
        android:background="#00ff00" />

    <SurfaceView
        android:id="@+id/surface_roi"
        android:layout_width="0dp"
        android:layout_height="0dp"
        android:background="#00ff0000" />


    <!--Start 및 뒤로가기 버튼-->
    <Button
        android:id="@+id/btn_ocrstart"
        android:layout_width="80dp"
        android:layout_height="80dp"
        android:layout_alignParentEnd="true"
        android:layout_alignParentRight="true"
        android:layout_centerVertical="true"
        android:layout_marginRight="10dp"
        android:background="#7d010000"
        android:onClick="onClickButton"
        android:text="Start"
        android:textColor="#ffffff"
        android:textSize="15dp" />

    <Button
        android:id="@+id/btn_finish"
        android:layout_width="40dp"
        android:layout_height="40dp"
        android:background="#7d010000"
        android:layout_alignParentRight="true"
        android:layout_alignParentBottom="true"
        android:layout_marginBottom="10dp"
        android:layout_marginRight="10dp"
        android:onClick="onClickButton"
        android:text="←"
        android:textColor="#ffffff"
        android:textSize="20dp"
         />

    <!-- OCR 결과 및 캡쳐이미지 출력-->
    <TextView
        android:id="@+id/text_ocrresult"
        android:layout_width="wrap_content"
        android:layout_height="50dp"
        android:layout_marginTop="15dp"
        android:layout_marginLeft="15dp"
        android:text="@string/ocr_result_tip"
        android:textColor="@android:color/holo_red_dark"
        android:textSize="20dp" />

    <ImageView
        android:id="@+id/image_capture"
        android:layout_width="wrap_content"
        android:layout_height="wrap_content"
        android:layout_centerHorizontal="true"
        android:layout_centerVertical="true"
         />

</RelativeLayout>
이 후 Java코드에서 방향 센서에 따라 portrait, landscape 에서 각각 ROI가 바뀌므로 여기서는 기본적인 속성을 설정하여 표시하지 않게 했다.
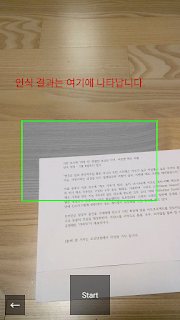
Java까지 작성하면 아래와 같은 결과가 나온다.


마지막으로 CameraView 소스다.
퍼미션 부분은 위의 OpenCV 링크에 나온 소스는 왜인지 잘 동작하지 않아서, 다른 소스를 참고해서 작성했다.
(onCreate 이전까지가 다르다.)
Android 6 이상부터 필요한 기능이고, 그 이하는 필요하지 않다.
Orientation 부분은 예전 글을 참고하자.
http://bluebead38.blogspot.kr/2017/05/android-studio-screenorientation-360.html
CameraView.java
  1
  2
  3
  4
  5
  6
  7
  8
  9
 10
 11
 12
 13
 14
 15
 16
 17
 18
 19
 20
 21
 22
 23
 24
 25
 26
 27
 28
 29
 30
 31
 32
 33
 34
 35
 36
 37
 38
 39
 40
 41
 42
 43
 44
 45
 46
 47
 48
 49
 50
 51
 52
 53
 54
 55
 56
 57
 58
 59
 60
 61
 62
 63
 64
 65
 66
 67
 68
 69
 70
 71
 72
 73
 74
 75
 76
 77
 78
 79
 80
 81
 82
 83
 84
 85
 86
 87
 88
 89
 90
 91
 92
 93
 94
 95
 96
 97
 98
 99
100
101
102
103
104
105
106
107
108
109
110
111
112
113
114
115
116
117
118
119
120
121
122
123
124
125
126
127
128
129
130
131
132
133
134
135
136
137
138
139
140
141
142
143
144
145
146
147
148
149
150
151
152
153
154
155
156
157
158
159
160
161
162
163
164
165
166
167
168
169
170
171
172
173
174
175
176
177
178
179
180
181
182
183
184
185
186
187
188
189
190
191
192
193
194
195
196
197
198
199
200
201
202
203
204
205
206
207
208
209
210
211
212
213
214
215
216
217
218
219
220
221
222
223
224
225
226
227
228
229
230
231
232
233
234
235
236
237
238
239
240
241
242
243
244
245
246
247
248
249
250
251
252
253
254
255
256
257
258
259
260
261
262
263
264
265
266
267
268
269
270
271
272
273
274
275
276
277
278
279
280
281
282
283
284
285
286
287
288
289
290
291
292
293
294
295
296
297
298
299
300
301
302
303
304
305
306
307
308
309
310
311
312
313
314
315
316
317
318
319
320
321
322
323
324
325
326
327
328
329
330
331
332
333
334
335
336
337
338
339
340
341
342
343
344
345
346
347
348
349
350
351
352
353
354
355
356
357
358
359
360
361
362
363
364
365
366
367
368
369
370
371
372
373
374
375
376
377
378
379
380
381
382
383
384
385
386
387
388
389
390
391
392
393
394
395
396
397
398
399
400
401
402
403
404
405
406
407
408
409
410
411
412
413
414
415
416
417
418
419
420
421
422
423
424
425
426
427
428
429
430
431
432
433
434
435
436
437
438
439
440
441
442
443
444
445
446
447
448
449
450
451
452
453
454
455
456
457
458
459
460
461
462
463
464
465
466
467
468
469
470
471
472
473
| package com.opencvocr;
import android.app.Activity;
import android.content.Intent;
import android.content.pm.PackageManager;
import android.content.res.Resources;
import android.graphics.Bitmap;
import android.graphics.Color;
import android.graphics.Matrix;
import android.hardware.SensorManager;
import android.os.AsyncTask;
import android.os.Build;
import android.os.Bundle;
import android.support.annotation.RequiresApi;
import android.support.v4.app.ActivityCompat;
import android.support.v4.content.ContextCompat;
import android.util.DisplayMetrics;
import android.util.Log;
import android.view.OrientationEventListener;
import android.view.SurfaceView;
import android.view.View;
import android.view.ViewGroup;
import android.view.WindowManager;
import android.widget.Button;
import android.widget.ImageView;
import android.widget.RelativeLayout;
import android.widget.TextView;
import android.widget.Toast;
import org.opencv.android.BaseLoaderCallback;
import org.opencv.android.CameraBridgeViewBase;
import org.opencv.android.LoaderCallbackInterface;
import org.opencv.android.OpenCVLoader;
import org.opencv.android.Utils;
import org.opencv.core.Mat;
import org.opencv.core.Rect;
import org.opencv.imgproc.Imgproc;
import static com.opencvocr.MainActivity.sTess;
public class CameraView extends Activity implements CameraBridgeViewBase.CvCameraViewListener2 {
private Mat img_input;
private static final String TAG = "opencv";
private CameraBridgeViewBase mOpenCvCameraView;
private String m_strOcrResult = "";
private Button mBtnOcrStart;
private Button mBtnFinish;
private TextView mTextOcrResult;
private Bitmap bmp_result;
private OrientationEventListener mOrientEventListener;
private Rect mRectRoi;
private SurfaceView mSurfaceRoi;
private SurfaceView mSurfaceRoiBorder;
private int mRoiWidth;
private int mRoiHeight;
private int mRoiX;
private int mRoiY;
private double m_dWscale;
private double m_dHscale;
private View m_viewDeco;
private int m_nUIOption;
private android.widget.RelativeLayout.LayoutParams mRelativeParams;
private ImageView mImageCapture;
private Mat m_matRoi;
private boolean mStartFlag = false;
// 현재 회전 상태 (하단 Home 버튼의 위치)
private enum mOrientHomeButton {Right, Bottom, Left, Top}
private mOrientHomeButton mCurrOrientHomeButton = mOrientHomeButton.Right;
static final int PERMISSION_REQUEST_CODE = 1;
String[] PERMISSIONS = {"android.permission.CAMERA"};
/*
// cpp 관련 부분. 지금은 필요하지 않음
static {
System.loadLibrary("opencv_java3");
System.loadLibrary("native-lib");
System.loadLibrary("imported-lib");
}
*/
private boolean hasPermissions(String[] permissions) {
// 퍼미션 확인
int result = -1;
for (int i = 0; i < permissions.length; i++) {
result = ContextCompat.checkSelfPermission(getApplicationContext(), permissions[i]);
}
if (result == PackageManager.PERMISSION_GRANTED) {
return true;
} else {
return false;
}
}
private void requestNecessaryPermissions(String[] permissions) {
ActivityCompat.requestPermissions(this, permissions, PERMISSION_REQUEST_CODE);
}
@Override
public void onRequestPermissionsResult(int requestCode, String permissions[], int[] grantResults) {
switch (requestCode) {
case PERMISSION_REQUEST_CODE: {
//퍼미션을 거절했을 때 메시지 출력 후 종료
if (!hasPermissions(PERMISSIONS)) {
Toast.makeText(getApplicationContext(), "CAMERA PERMISSION FAIL", Toast.LENGTH_LONG).show();
finish();
}
return;
}
}
}
private BaseLoaderCallback mLoaderCallback = new BaseLoaderCallback(this) {
@Override
public void onManagerConnected(int status) {
switch (status) {
case LoaderCallbackInterface.SUCCESS: {
// 퍼미션 확인 후 카메라 활성화
if (hasPermissions(PERMISSIONS))
mOpenCvCameraView.enableView();
}
break;
default: {
super.onManagerConnected(status);
}
break;
}
}
};
@RequiresApi(api = Build.VERSION_CODES.CUPCAKE)
@Override
protected void onCreate(Bundle savedInstanceState) {
super.onCreate(savedInstanceState);
setContentView(R.layout.camera_view);
getWindow().addFlags(WindowManager.LayoutParams.FLAG_KEEP_SCREEN_ON);
if (!hasPermissions(PERMISSIONS)) { //퍼미션 허가를 했었는지 여부를 확인
requestNecessaryPermissions(PERMISSIONS);//퍼미션 허가안되어 있다면 사용자에게 요청
} else {
//이미 사용자에게 퍼미션 허가를 받음.
}
// 카메라 설정
mOpenCvCameraView = (CameraBridgeViewBase) findViewById(R.id.activity_surface_view);
mOpenCvCameraView.setVisibility(SurfaceView.VISIBLE);
mOpenCvCameraView.setCvCameraViewListener(this);
mOpenCvCameraView.setCameraIndex(0); // front-camera(1), back-camera(0)
mLoaderCallback.onManagerConnected(LoaderCallbackInterface.SUCCESS);
//뷰 선언
mBtnOcrStart = (Button) findViewById(R.id.btn_ocrstart);
mBtnFinish = (Button) findViewById(R.id.btn_finish);
mTextOcrResult = (TextView) findViewById(R.id.text_ocrresult);
mSurfaceRoi = (SurfaceView) findViewById(R.id.surface_roi);
mSurfaceRoiBorder = (SurfaceView) findViewById(R.id.surface_roi_border);
mImageCapture = (ImageView) findViewById(R.id.image_capture);
//풀스크린 상태 만들기 (상태바, 네비게이션바 없애고 고정시키기)
m_viewDeco = getWindow().getDecorView();
m_nUIOption = getWindow().getDecorView().getSystemUiVisibility();
if (Build.VERSION.SDK_INT >= Build.VERSION_CODES.ICE_CREAM_SANDWICH)
m_nUIOption |= View.SYSTEM_UI_FLAG_HIDE_NAVIGATION;
if (Build.VERSION.SDK_INT >= Build.VERSION_CODES.JELLY_BEAN)
m_nUIOption |= View.SYSTEM_UI_FLAG_FULLSCREEN;
if (Build.VERSION.SDK_INT >= Build.VERSION_CODES.KITKAT)
m_nUIOption |= View.SYSTEM_UI_FLAG_IMMERSIVE_STICKY;
m_viewDeco.setSystemUiVisibility(m_nUIOption);
mOrientEventListener = new OrientationEventListener(this,
SensorManager.SENSOR_DELAY_NORMAL) {
@Override
public void onOrientationChanged(int arg0) {
//방향센서값에 따라 화면 요소들 회전
// 0˚ (portrait)
if (arg0 >= 315 || arg0 < 45) {
rotateViews(270);
mCurrOrientHomeButton = mOrientHomeButton.Bottom;
// 90˚
} else if (arg0 >= 45 && arg0 < 135) {
rotateViews(180);
mCurrOrientHomeButton = mOrientHomeButton.Left;
// 180˚
} else if (arg0 >= 135 && arg0 < 225) {
rotateViews(90);
mCurrOrientHomeButton = mOrientHomeButton.Top;
// 270˚ (landscape)
} else {
rotateViews(0);
mCurrOrientHomeButton = mOrientHomeButton.Right;
}
//ROI 선 조정
mRelativeParams = new android.widget.RelativeLayout.LayoutParams(mRoiWidth + 5, mRoiHeight + 5);
mRelativeParams.setMargins(mRoiX, mRoiY, 0, 0);
mSurfaceRoiBorder.setLayoutParams(mRelativeParams);
//ROI 영역 조정
mRelativeParams = new android.widget.RelativeLayout.LayoutParams(mRoiWidth - 5, mRoiHeight - 5);
mRelativeParams.setMargins(mRoiX + 5, mRoiY + 5, 0, 0);
mSurfaceRoi.setLayoutParams(mRelativeParams);
}
};
//방향센서 핸들러 활성화
mOrientEventListener.enable();
//방향센서 인식 오류 시, Toast 메시지 출력 후 종료
if (!mOrientEventListener.canDetectOrientation()) {
Toast.makeText(this, "Can't Detect Orientation",
Toast.LENGTH_LONG).show();
finish();
}
}
public void onClickButton(View v) {
switch (v.getId()) {
//Start 버튼 클릭 시
case R.id.btn_ocrstart:
if (!mStartFlag) {
// 인식을 새로 시작하는 경우
// 버튼 속성 변경
mBtnOcrStart.setEnabled(false);
mBtnOcrStart.setText("Working...");
mBtnOcrStart.setTextColor(Color.LTGRAY);
bmp_result = Bitmap.createBitmap(m_matRoi.cols(), m_matRoi.rows(), Bitmap.Config.ARGB_8888);
Utils.matToBitmap(m_matRoi, bmp_result);
// 캡쳐한 이미지를 ROI 영역 안에 표시
mImageCapture.setVisibility(View.VISIBLE);
mImageCapture.setImageBitmap(bmp_result);
//Orientation에 따라 Bitmap 회전 (landscape일 때는 미수행)
if (mCurrOrientHomeButton != mOrientHomeButton.Right) {
switch (mCurrOrientHomeButton) {
case Bottom:
bmp_result = GetRotatedBitmap(bmp_result, 90);
break;
case Left:
bmp_result = GetRotatedBitmap(bmp_result, 180);
break;
case Top:
bmp_result = GetRotatedBitmap(bmp_result, 270);
break;
}
}
new AsyncTess().execute(bmp_result);
} else {
//Retry를 눌렀을 경우
// ImageView에서 사용한 캡쳐이미지 제거
mImageCapture.setImageBitmap(null);
mTextOcrResult.setText(R.string.ocr_result_tip);
mBtnOcrStart.setEnabled(true);
mBtnOcrStart.setText("Start");
mBtnOcrStart.setTextColor(Color.WHITE);
mStartFlag = false;
}
break;
// 뒤로 버튼 클릭 시
case R.id.btn_finish:
//인식 결과물을 MainActivity에 전달하고 종료
Intent intent = getIntent();
intent.putExtra("STRING_OCR_RESULT", m_strOcrResult);
setResult(RESULT_OK, intent);
mOpenCvCameraView.disableView();
finish();
break;
}
}
public void rotateViews(int degree) {
mBtnOcrStart.setRotation(degree);
mBtnFinish.setRotation(degree);
mTextOcrResult.setRotation(degree);
switch (degree) {
// 가로
case 0:
case 180:
//ROI 크기 조정 비율 변경
m_dWscale = (double) 1 / 2;
m_dHscale = (double) 1 / 2;
//결과 TextView 위치 조정
mRelativeParams = new android.widget.RelativeLayout.LayoutParams(ViewGroup.LayoutParams.WRAP_CONTENT, ViewGroup.LayoutParams.WRAP_CONTENT);
mRelativeParams.setMargins(0, convertDpToPixel(20), 0, 0);
mRelativeParams.addRule(RelativeLayout.CENTER_HORIZONTAL);
mTextOcrResult.setLayoutParams(mRelativeParams);
break;
// 세로
case 90:
case 270:
m_dWscale = (double) 1 / 4; //h (반대)
m_dHscale = (double) 3 / 4; //w
mRelativeParams = new android.widget.RelativeLayout.LayoutParams(convertDpToPixel(300), ViewGroup.LayoutParams.WRAP_CONTENT);
mRelativeParams.setMargins(convertDpToPixel(15), 0, 0, 0);
mRelativeParams.addRule(RelativeLayout.CENTER_VERTICAL);
mTextOcrResult.setLayoutParams(mRelativeParams);
break;
}
}
//dp 단위로 입력하기 위한 변환 함수 (px 그대로 사용 시 기기마다 화면 크기가 다르기 때문에 다른 위치에 가버림)
public int convertDpToPixel(float dp) {
Resources resources = getApplicationContext().getResources();
DisplayMetrics metrics = resources.getDisplayMetrics();
float px = dp * (metrics.densityDpi / 160f);
return (int) px;
}
public synchronized static Bitmap GetRotatedBitmap(Bitmap bitmap, int degrees) {
if (degrees != 0 && bitmap != null) {
Matrix m = new Matrix();
m.setRotate(degrees, (float) bitmap.getWidth() / 2, (float) bitmap.getHeight() / 2);
try {
Bitmap b2 = Bitmap.createBitmap(bitmap, 0, 0, bitmap.getWidth(), bitmap.getHeight(), m, true);
if (bitmap != b2) {
//bitmap.recycle(); (일반적으로는 하는게 옳으나, ImageView에 쓰이는 Bitmap은 recycle을 하면 오류가 발생함.)
bitmap = b2;
}
} catch (OutOfMemoryError ex) {
// We have no memory to rotate. Return the original bitmap.
}
}
return bitmap;
}
@Override
public void onPause() {
super.onPause();
if (mOpenCvCameraView != null)
mOpenCvCameraView.disableView();
}
@Override
public void onResume() {
super.onResume();
if (!OpenCVLoader.initDebug()) {
Log.d(TAG, "onResume :: Internal OpenCV library not found.");
OpenCVLoader.initAsync(OpenCVLoader.OPENCV_VERSION_3_2_0, this, mLoaderCallback);
} else {
Log.d(TAG, "onResume :: OpenCV library found inside package. Using it!");
mLoaderCallback.onManagerConnected(LoaderCallbackInterface.SUCCESS);
}
}
public void onDestroy() {
super.onDestroy();
if (mOpenCvCameraView != null)
mOpenCvCameraView.disableView();
}
@Override
public void onCameraViewStarted(int width, int height) {
}
@Override
public void onCameraViewStopped() {
}
@Override
public Mat onCameraFrame(CameraBridgeViewBase.CvCameraViewFrame inputFrame) {
// 프레임 획득
img_input = inputFrame.rgba();
// 가로, 세로 사이즈 획득
mRoiWidth = (int) (img_input.size().width * m_dWscale);
mRoiHeight = (int) (img_input.size().height * m_dHscale);
// 사이즈로 중심에 맞는 X , Y 좌표값 계산
mRoiX = (int) (img_input.size().width - mRoiWidth) / 2;
mRoiY = (int) (img_input.size().height - mRoiHeight) / 2;
// ROI 영역 생성
mRectRoi = new Rect(mRoiX, mRoiY, mRoiWidth, mRoiHeight);
// ROI 영역 흑백으로 전환
m_matRoi = img_input.submat(mRectRoi);
Imgproc.cvtColor(m_matRoi, m_matRoi, Imgproc.COLOR_RGBA2GRAY);
Imgproc.cvtColor(m_matRoi, m_matRoi, Imgproc.COLOR_GRAY2RGBA);
m_matRoi.copyTo(img_input.submat(mRectRoi));
return img_input;
}
private class AsyncTess extends AsyncTask<Bitmap, Integer, String> {
@Override
protected String doInBackground(Bitmap... mRelativeParams) {
//Tesseract OCR 수행
sTess.setImage(bmp_result);
return sTess.getUTF8Text();
}
protected void onPostExecute(String result) {
//완료 후 버튼 속성 변경 및 결과 출력
mBtnOcrStart.setEnabled(true);
mBtnOcrStart.setText("Retry");
mBtnOcrStart.setTextColor(Color.WHITE);
mStartFlag = true;
m_strOcrResult = result;
mTextOcrResult.setText(m_strOcrResult);
}
}
}
|
Line 202:
기기의 회전 상태에 따라 각각의 뷰들이 함께 회전한다.
(이때 왜인지 portrait와 landscape를 제외한 나머지 둘 90, 180도는 TextView가 어딘가에 가려진듯 보이지 않는다.)
Line 258:
Start 버튼을 누르면 Rect형식으로 지정된 ROI 영역을 Mat 형식으로 가져오게 되고, 그것을 Bitmap으로 전환시켜 AsyncTask 객체로 Tesseract OCR 작업을 한다. (일반 함수를 쓰면 처리를 하는 동안 카메라 프레임이 멈춘다.)
Line 268:
기기의 회전 상태에 따라 인식될 비트맵도 함께 회전한다.
Line 287:
Retry를 누르면 모든 뷰들이 처음 상태로 돌아온다.
Line 303:
뒤로가기(화살표)를 누르면 putExtra 메소드를 통해 결과가 MainActivity로 전송되고, 카메라를 종료한다.
Line 441:
ROI 영역은 글자 인식 영역이므로 흑백 처리를 한다.
Line 460:
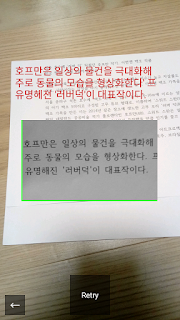
AsyncTask 종료 후 결과를 TextView에 출력한다.
인식 테스트 결과는 다음과 같다.
사진은 꽤 잘 되는것처럼 나왔지만, 깨끗하게 촬영하지 않을 시 상당히 오랜 시간이 걸렸음에도 제대로 된 결과를 출력하지 못할 때가 많았다.
또한 JavaCameraView도 중간에 문제가 있는지 오랜시간 켜두면 꺼지는 현상이 있는데, 에러로그를 출력하지 않아서 이유를 못찾고 있다.
+ 메모리 초과 문제로 추정된다.


+ Github 등록
https://github.com/bluebead38/OpenCVTesseractOcr
Tesseract 버전 최신으로 변경 및 compile 대신 implement 이용
- 참고 사이트
Tesseract : http://cosmosjs.blog.me/220937785735
Intent : http://arabiannight.tistory.com/entry/%EC%95%88%EB%93%9C%EB%A1%9C%EC%9D%B4%EB%93%9CAndroid-Intent%EB%A1%9C-%EB%8D%B0%EC%9D%B4%ED%84%B0-%EC%A3%BC%EA%B3%A0-%EB%B0%9B%EA%B8%B0
Permission : http://blog.naver.com/lawra20/220674924962
ROI 흑백처리 : http://answers.opencv.org/question/27677/how-to-convert-roi-in-gray-monochrome-on-android/
pixel dp convert : http://neoroid.tistory.com/entry/Android-pixel-to-dp-dp-to-pixel
Bitmap 회전 : http://snowbora.tistory.com/428


[Google+ 질문댓글 백업]
답글삭제임정욱
1년 전 - 공개적으로 공유함
도움 주셔서 너무 감사드려요!! 덕분에
성공 했습니다.
그런데 저는 한글인식이 잘 안되네요 ㅎㅎ
실행도중에 갑자기 꺼져버리기도 하고 많이 불안하네요!!
한글인식이 더 잘되려면 Tesseract 훈련을 해야하나요??
좋은 방법 아시면 부탁드립니다.
답글
홍다슬
1년 전
성공하셨다니 다행입니다.
인식은 최대한 밝은 곳에서 적은 양의 글씨로 하면 그나마 괜찮을 겁니다(...)
꺼지는 원인은 저도 일단은 찾고 있는 중이고, 알게 되면 글에 추가할 예정입니다.
훈련은 새로운 패턴(다른 폰트)을 익히는데는 도움이 될 것 같지만
조명이나 초점 등의 문제로 뚜렷하지 않게 인식된 텍스트를 잘 인식하게 도와줄 수 있을지는 모르겠습니다.
그 부분은 OpenCV 명도 대비 조정이나 카메라 제어를 하는 방향으로 가야할 것 같구요.
애초에 tessdata도 흰 배경에 검은글씨로 훈련되어 있기 때문에 최대한 그 색깔에 맞추지 않으면 인식이 어려워지는 것 같습니다.
임정욱
1년 전 (수정됨) - 공개적으로 공유함
답변 감사드립니다.
문제해결하고 다시 실행을 하니 CameraView 클래스의 System.loadLibrary("imported-lib") 라인에서 에러가 발생하네요
imported-lib.so 파일을 찾을수 없다고 나오는데
앱의 cpp폴더안에 opencv_java3와 native-lib 두개만 있고요 imported-lib 은 없네요
imported-lib.so 는 어떻게 생성하나요???
CMakeLists.txt 에 추가를 해줘햐 하는건가요??
소스나 방법을 알려주시면 감사하겠습니다.
부탁드립니다.
오늘도 좋은하루 되세요!!
답글
홍다슬
1년 전
여러개의 cpp 파일을 쓰고자 할때 library를 나눠서 쓰는 방식입니다. 이것저것 해본 상태로 소스를 올리다보니 정리를 못했네요.
수정하도록 하겠습니다.
일단 현재 프로그램에서는 cpp를 아예 쓰지 않기 때문에 필요없는 부분이라 제거하셔도 상관 없고,
(사실 그 static문을 통째로 지워도 상관 없습니다)
제가 해봤던 것은 이 글입니다.
http://webnautes.tistory.com/1055
임정욱
1년 전 - 공개적으로 공유함
안녕하세요! 안드로이드를 공부하고 있는 초보자입니다.
따라하다 보니 임플리먼트에서 CameraBridgeViewBase.CvCameraViewListener2 가 빨간색으로 오류가 뜨는데
필수적으로 오버라이드 해야하는것들을 해주지 않아서 오류가 뜨는건가요??
똑같이 따라했는데도 오류가 나네요!!
도움주시면 감사하겠습니다.
답글
홍다슬
1년 전
CvCameraViewListener2 는 OpenCV에 포함된 객체입니다. OpenCV에 대한 것은 맨 처음에 썼던 링크에 잘 정리되어 있어서 굳이 더 설명하지 않았습니다.
링크의 2번 과정을 참고하셔서 OpenCV 라이브러리가 정상적으로 추가되었는지 확인해보세요.
12-27 16:47:08.025 8779-8779/com.bluebead38.opencvtesseractocr E/AndroidRuntime: FATAL EXCEPTION: main
답글삭제Process: com.bluebead38.opencvtesseractocr, PID: 8779
java.lang.UnsatisfiedLinkError: Native method not found: org.opencv.core.Mat.n_Mat:(III)J
깃허브에서 받아서 실행시켜봣는데 이러한 에러가 발생합니다
카메라 버튼을 누르면 에러가 발생하며 종료됩니다 혹시 해결방법 아실까요?